Showing posts with label nail art. Show all posts

Wednesday, May 21, 2014

ARTSY WEDNESDAY: Farewell

For my last Artsy Wednesday, I used Rimmel Mintilicious as the base and stamped flowers using Bundle Monster stamping plate BM02 and Wet n Wild Black Creme.


I think this is a fair representation of why it's time for Artsy Wednesday to end. While it was fun to have the challenges, sometimes I just wanted to do nail art that didn't have to do with the challenges, and doing my nails every 2 weeks was kind of hard. I also have been getting busier, hence why this picture is so awful: it's just one I took on my phone.

Check out the other girls' manicures for the last time:


Wednesday, March 5, 2014

ARTSY WEDNESDAY: Inspired by a tutorial

I decided to try a Saran Wrap mani this week. It was inspired by this tutorial from Nailed It. I LOVE the graphic she made for the tutorial!


For my version, I used Sephora by O.P.I Havana Dreams and Maybelline Sapphire Siren. I mattified the look using Sally Hansen Big Matte Top Coat. [I LOVE this top coat and highly recommend it!!!] I painted a layer of Havana Dreams first, and once it dried, I painted a coat of Sapphire Siren on top and dabbed the wet nail polish with Saran Wrap. The great part about this is that if you don't like how it looks when you dab off some nail polish, you can just add more and try again! :)

Check out the other girls' manicures:


Wednesday, February 19, 2014

ARTSY WEDNESDAY: Neutral nails

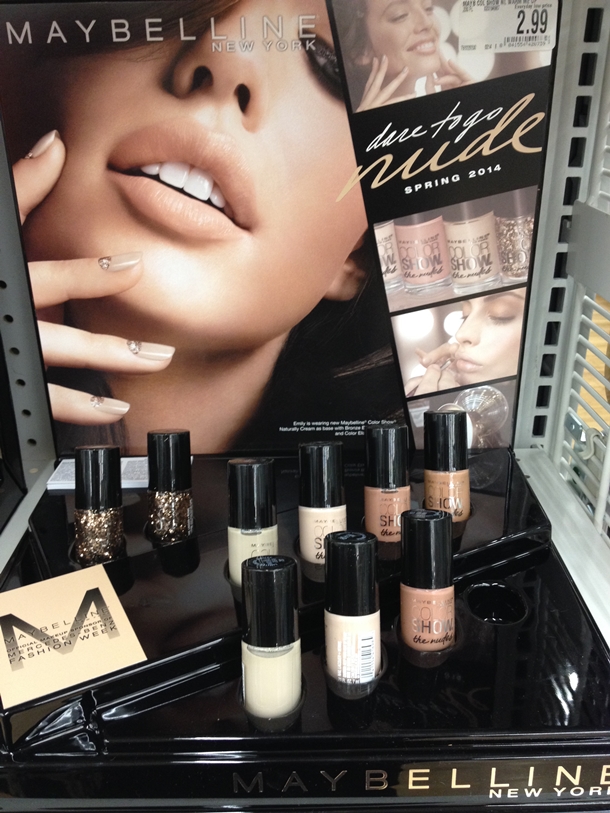
This week's theme was neutral. My nails were inspired by the Maybelline "Dare to Go Nude" ad:


I was short on time, so I did not have as much time to do and photograph my nails as I normally like. :(


I used Sally Hansen Big Money for the gold base and NYC Prospect Park Bloom on top.

Check out the other girls' neutral manicures:


Wednesday, February 5, 2014

ARTSY WEDNESDAY: Inspired by a song

I saw Frozen a few months ago, and I couldn't get the song "Let It Go" out of my head. Here's a video of the song from YouTube:


Here are the nails I did:


I did the gradient using Sally Hansen Pacific Blue and sponged on Rimmel 60-Second Nail Polish in Mintilicious. I then topped them with a coat of China Glaze Luxe and Lush.

Check out the other girl's manicures:


Wednesday, January 8, 2014

ARTSY WEDNESDAY: Metallic nails

This barely qualifies as metallic, but I really wanted to do this gradient and I figured...silver counts as metal, right? ;)

The base is Essie Chincilly and the glitter is Julep Paris. Sorry, my skin looks strange in this picture, I have no idea why. 


Check out the other girl's manicures:


Wednesday, November 13, 2013

ARTSY WEDNESDAY: White nails

This week's theme was white. I did a white and silver manicure using striping tape. I used OPI Designer De Better and Wet n Wild French White Creme. This was definitely pretty time consuming, but I think it was worth it:


Check out the other girl's manicures:


Wednesday, October 16, 2013

ARTSY WEDNESDAY: Crystals

This week's theme was crystals. I did a saran wrap manicure using Wet n Wild Tickled Pink and BK Neon Luminous Glow in #13. I did a coat of the BK polish, and then did a coat of the Wet n Wild polish. While the Wet n Wild one was wet, I dabbed saran wrap in it. After this dried, I added the crystals.


Check out the other girl's manicures:


Wednesday, October 2, 2013

ARTSY WEDNESDAY: Disney-Inspired Nail Art

I was running a bit short on time this week, and so I couldn't spend as much time on my nails as I would've liked to. I didn't really have a good reason for doing 101 Dalmatians-themed nails; I just saw Sally Hansen Diamonds and Rubies in my nail polish stash and thought that it was the perfect "101-Dalmatians red."


I used Diamonds and Rubies as my base and then covered it with one strip of striping tape to make the red stripes on my nails. I used Wet n Wild French White Creme as the white and a Sharpie for the black spots. I covered my nails in PVA peelable base coat to prevent the sharpie from smudging [thanks for the tip Michele], and then used top coat. I'm not happy with my NYC top coat right now because there have been bubbles on my nails the last couple of times I used it. I'll need to find a new top coat. Any suggestions of good drugstore top coats? Should I just go with Seche Vite?

Check out the other girl's Disney-inspired manicures:


Wednesday, September 25, 2013

TUTORIAL: How to do Splatter Nails WITHOUT Blowing Through a Straw!

I really wanted to rock a splatter mani, but every time I try the blowing through a straw method my nails just look like a hot mess. I tested two methods to see if there was another way to do splatter nails.

Here's my best result:


I used Revlon Minted as the base and black and white acrylic paint for the splatter. I did this using an old toothbrush:


First, I put Vaseline all over my hands so the splatter wouldn't make a mess all over my fingers. Then, I dipped an old toothbrush in some paint (I used black first) and ran my thumb over the bristles to produce "splatter." I would def recommend wearing gloves when you do this, even though I didn't in this picture:

(Here, I was running my thumb from the right to the left on the toothbrush, and I produced the black splatter shown on the paper below.)

After letting the black splatter dry, I repeated the process with the white acrylic paint. After that dried, I sealed everything with top coat and wiped the Vaseline off my fingers. I tried doing this method with black and white nail polish instead of acrylic paint, but I couldn't get a good splatter.

I also tried to make splatter by dabbing a mascara wand into some polish and tapping the wand on my nails:


This doesn't look like splatter, but I still think it ended up interesting.

Have you had success with splatter? If you have any tips, please share! 

Wednesday, September 11, 2013

Guest Post: Nail of the Day - Ombre and Stripes

I'm super excited today for two reasons: first, I'm halfway to my goal of 30 followers!!! Remember to enter my Stila Lip Glaze giveaway; I'll pick a winner once this blog reaches 30 followers on Bloglovin or GFC. Second, I have a GREAT guest post today from Steph of Fun Sized Beauty:

I know Anna is a huge fan of nail polish and nail art, so I thought I'd try my hand at something interesting! This nail look is a combination of a rainbow ombre and striping tape. 


Products Used: 

  • Maybelline - Porcelain Party 
  • Born Pretty Store -Striping Tape
  • Quo - Makeup Sponges
  • Julep - Renee
  • Forever 21 - Baby Blue
  • Cheeky Monkey - Tramp Stamp
How to get the look:
  1. Use a 2 coats of your favourite white polish. Make sure to let it dry completely before moving on to the next step.
  2. Place striping tape randomly criss-crossing over the nails.
  3. Paint one stripe of each Blue, Pink, and Purple over the sponge and pat the sponge over the nail. Apply more polish as needed and do the same patting motion on the other nails. For more detailed instruction on the ombre sponging see here.
  4. Quickly remove the striping tape with a pair of tweezers. Removing the striping tape will reveal crisp white lines underneath. 
Ta-da! Your striped ombre pastel nails are complete! 

Will you try out this nail look?

Aren't these great?! Thank you so much Steph for doing a guest post!! This is a great tutorial!!

Wednesday, September 4, 2013

ARTSY WEDNESDAY: Three colors

Today's theme was three colors:


I used Rimmel 60 Second Nail Polish in Mintilicious as the base, and Kiss Brush-on Nail Art Polish in White and Wet 'n Wild Tickled Pink on top. After letting my base coat dry, I dipped a wand in some white polish, and then brushed the wand against my nail from my finger tips back to the middle of my nail. Then, after the white dried, I did the same thing with Tickled Pink. For my ring finger, I just dipped the mascara wand in white polish and then randomly brushed it against my nail. I think it ended up looking interesting; I want to try it with light colors on a dark background and see if the design will pop more.

Check out what the other girls did this week:


Wednesday, August 7, 2013

ARTSY WEDNESDAY: Blue

Today's theme was blue. I had wanted to try using Sally Hansens's Mermaid's Tale in nail art, and I thought this was a great time to try:


Here, I used it with BK- Neon Luminous Glow Polish #6. After using Mermaid's Tale as the base, I used striping tape to create the stripes, and I did the flower on my fourth finger with a brush.

Check out the other girls' blue manis:

Wednesday, July 24, 2013

ARTSY WEDNESDAY: Designer-inspired

Today's theme was designer-inspired. I was inspired by this gorgeous Monique Lhuillier dress:


I was pleased that my idea for my nails panned out:


I used Wet n Wild Shine Black Creme as the base, and used paper reinforcements to make the half-moons. [There's a great tutorial here.] I used Wet n Wild Shy on top of the black. Last, I used one of my new Bundle Monster stamping plates, BM-20, to stamp the design on top of my half-moon manicure. 

This was my first time doing a half-moon manicure with paper reinforcements, and I learned how important it is not to use a thick polish for your top color. If the polish is too thick, then it's hard to get a clear half-moon. Also, if you accidentally put too much polish on your nail, you also don't get pretty half-moons. This was also my first time using my stamping plates; I plan on doing a review of the plates soon, and I'll include some tips on stamping there, too. Also, let me know if you would like a more detailed tutorial of this!

Be sure to check out the other girls' designer-inspired manis:


Tuesday, April 23, 2013

Nail Art for West

Many of you probably heard about the two tragedies that happened last week at the Boston Marathon and in West, Texas (some news outlets were saying Waco). I grew up near West, and so hearing about the fertilizer factory explosion really hit home. It was weird seeing places that I am familiar with in some of the pictures online. As an act of solidarity for the people of West, I did a manicure of Czech flags because the majority of people in West are of Czech decent:


 I realize this may not be my most amazing nail art ever; I've been short on time this week and have had a lot of things go wrong that I'm trying to fix (such as getting my phone stolen :/). But I hope that you all can appreciate the sentiment behind it. If you guys would like a step-by-step tutorial of this, let me know.

xoxo,


Friday, April 19, 2013

Guest Post Flower Nail Art Tutorial on Fun Size Beauty!!

I have a guest post up on Fun Size Beauty today!! I did a tutorial for floral nail art!! Be sure to check it out!!


Here's a closer look at the nails I did:

xoxo,


Sunday, March 31, 2013

Polka Dotted Nail Art with Milani Hot Pink + Tutorial

Happy Easter everyone!!! I got a bottle of Milani Jewel FX in Hot Pink as a part of my Spring Break shopping haul, and I used it this week to do nail art. One of my roommates said they reminded her of Easter eggs, so I thought it would be appropriate to post it today:

Nail art using Wet n Wild Tickled Pink and Milani Hot Pink

This Milani polish took some patience to use. It was nice that there was a lot of glitter in the bottle, but when I applied it, it would come on my nails in clumps. I had to put a drop in the center of my nail and then spread it on the rest of my nail.

Picture of Milani Jewel FX in Hot Pink

I did 2 coats on my accent finger and then used a toothpick to pick a few pieces of glitter out of the bottle and cover the remaining bald spots. If you're interested in how I did the polka dotted nails, see the tutorial below:


1. Paint a base coat and a coat of the color of your choice (here, I used Wet n Wild Tickled Pink).
2. Wait for the base to COMPLETELY dry. Use a toothpick to pick one glitter piece off of the stem of the brush. It's easier to avoid getting pieces that have clumps of the clear base this way.
3. I started out by making a row on the bottom of my nail. Then, I put the next set of polka dots in the spaces between my first row.
4. After making my first two rows, I lined the dots in the third row up with the ones in the first row and the ones in the fourth row with the ones in the second row. I kept doing this until I finished the nail.

I actually really liked how this turned out and may try it with some of my other glitter polishes in the future. I hope the tutorial is helpful!! Let me know if you try this! :)

Thursday, March 21, 2013

My First Experience with CND Shallac Nail Art

One of my childhood friends just got her cosmetology license, and she asked if she could practice Shellac on me. A free manicure? OF COURSE I took her up on that!! And she did a good job:


She did a gradient using a light pink and a darker pink nail pigment. This is the first time I'd seen someone using nail pigments for gradients; I normally use a sponge for them, but I think I may try using pigments soon. She did a bottom coat and then did the light pink. Then, she used a brush to place the pigment on my nails; she first tapped the brush full of powder near my cuticles. Then, after rubbing off excess powder on a napkin, she dabbed the powder and pushed some of it out toward the ends of my nails to make the gradient. Then, she put on a layer of top coat to seal the powder in.

The entire thing took about an hour and a half, but I think it was worth it because this manicure has lasted soooo much longer than any of mine ever have! I have major problems with chipping because I love using my hands too much. But even after a week of opening makeup containers, washing dishes, etc, this manicure looks perfect!! I don't even have a single chip! :)

I got too bored to keep them for longer than a week, and so I pulled them off using the removal wipes my friend gave me. The pack contained 10 removal wipes, one for each nail, and an orangewood stick:

The pack of removal wipes & its contents

The wipes on my hand

I put 100% acetone on the wipes and wrapped them around my fingers. The package said to leave the wraps on for 10 minutes. I left the wipes on for about 20 minutes, and still, not all the polish came off easily. I had to use the orangewood stick to peel off a lot of polish. I did discover that the wraps worked better if they were tight around my fingers and could not wiggle around.

Overall, I'd probably do Shellac again, but probably only for a special occasion; I loved the wear time, but pulling it off was sooo difficult and 100% acetone isn't too great for your nails or skin.